
Use
daedalus.rrrehabin 3 simple steps:
Detailed Steps
1. Upload your landform surface
Upload a topological surface as a triangle mesh or grid. Supported file types are DXF, Vulcan Triangulation (00t), and Vulcan Grid (sfg). It is recommended to compress the file as a .zip archive to reduce the upload size.
2. Upload and configure shaping areas
daedalus.rrrehab classes two types of polygons, the area polygons and the name polygons. A polygon can be classed as both. It is common to use the same polygon for the area and name. An area polygon is the polygon that dictates the shaping parameters; the target angle and swell ratio. A name polygon is used as a mask for reporting cut and fill volumes. More than one polygon can be uploaded, since more than one area or name might be required for the shaping job. Each area polygon requires the following two shaping parameters:
- The target angle. This angle is in degrees and defines the angle that the shaping algorithm tries to achieve within the associated polygon.
- The swell ratio. This is a one-base percentage of how much swell should be applied to the cut when achieving a cut/fill balance. A number of 1 = 100% (no swell). For example, a 20% swell would require the input 1.2 = 120%.
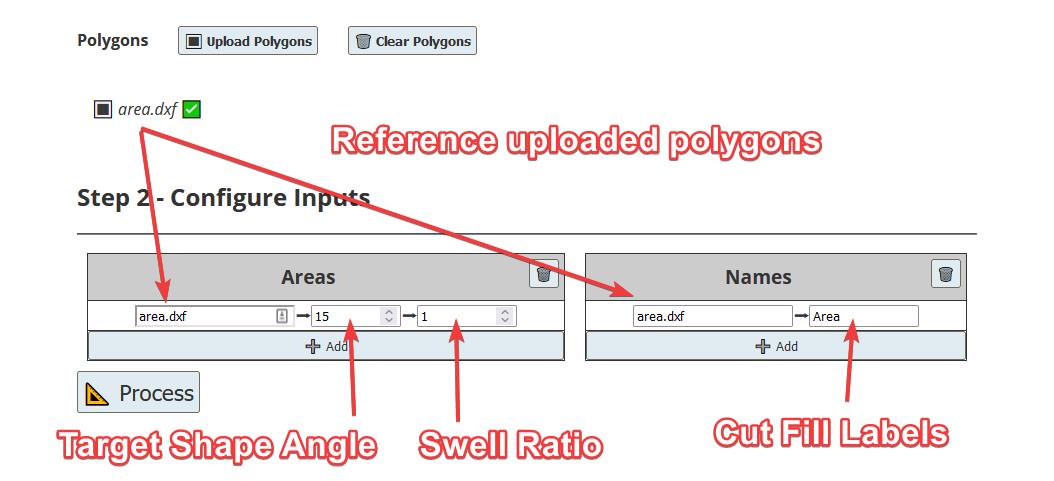
3. Process and await results
Hit the Process button to send your configuration to the server for processing. Generally the processing will begin unless any errors are encountered with the inputs. The shaping algorithm will take some time to solve for the given surface, an email will be sent to you once the processing finishes. The shaping is not guaranteed to succeed! Shaping can fail if the angle cannot be achieved, or if the cut/fill does not balance within a tolerance.
If a successful shape occurs, head back to daedalus.rrrehab and the results will automatically load up. The results table will outline the cut and fill volumes between the original surface and the shaped surface, with the name polygons used to delineate row items. The surface can also be visually inspected using the 3D context view. Rotate, pan, and zoom around to inspect the surface for validity or artifacts. The m key toggles a measure mode. Finally, download the results using the button.
A note on measure mode
To reduce loading times and system load, the data used in the 3D viewer is simplified. This simplification process leads to a slight loss in detail, and can lead to measurements not being accurate.
Usage Tips
- Try shaping with one large polygon to get a base result happening.
- Ensure the area polygons extend past the extents of required shaping areas to allow for the required movement in the surface to achieve a cut/fill balance.
- Each area polygon is processed in order and progressively. This can be leveraged to layer target angles. For example, to have multiple target grades being applied, use a larger polygon with the steeper grade, and then a smaller polygon with the shallower angle.
- Area polygons can overlap, which is useful for applying multi-grades.